With its long history of success, Microsoft has inspired many developers to design Office 365 add-ins that users can integrate with their productivity suite. In this article, we’ll look at five of the most useful, and in our opinion the best Office 365 add-ins you should use. If you’re interested in sampling them as we go along, you can launch the Microsoft Store from any of your Office applications by navigating to the Insert tab and choosing Store.

Some Office 365 add-ins are free, but others have associated costs. See the add-in descriptions or links below for more information. At any time, you can manage your current list of add-ins by selecting My Add-ins from the Insert tab.
1) Office Tabs
Office Tabs lets you manage multiple documents with ease, introducing a document bar below your Word, Excel, and PowerPoint ribbons. Traditionally, you’d have to hover over the Office on your taskbar and select a different window to switch to another document. Now, you can simply click on the tab corresponding to the document you’d like to open from within any existing document!

For additional customization, Office Tabs features a setup wizard that lets you choose the Office versions and components you’d like to use. Here’s a screenshot of the General setup tab for Microsoft Word:

Here, you can modify various options that pertain to Word, Excel, and PowerPoint and even assign keyboard shortcuts for power use. The Style & Color tab allows you to specify the styles, layouts, fonts, and colors for your tabs.

Note that all options except Layout feature a Preview mode that lets you see what the changes will look like in your Office application. The add-in also lets you choose a preferred language and access online help.
As for costs, you can download an evaluation copy of Office Tabs for free. The standard version of Office Tabs currently costs $29.00 and supports Microsoft Word, Excel, and PowerPoint. For a price of $39.00, the Enterprise version supports Microsoft Word, Excel, PowerPoint, Publisher, Access, Project, and Visio. All in all, Office Tabs is a worthwhile investment that lets you work more efficiently and gives you greater control over Office document management.
2) PayPal for Outlook
The free PayPal add-in lets you easily attach PayPal payments Outlook emails. Below is an example email you might send after meeting up with an old friend for lunch:

If you look in the lower right-hand corner of the email, you’ll spot the PayPal logo:

Simply click this logo to open up the PayPal app. You can then specify the amount you wish to send.

NOTE: The add-in automatically retrieves the address of the person you are emailing and identifies them as the recipient. If you’d like to send the money to a different recipient, simply click on the Send to someone else link.
Click the Next button to send the amount you entered. Just as with any other online transaction through PayPal, you’ll be asked to verify your PayPal credentials by logging in and choosing how you wish to pay.

3) Boomerang
Boomerang lets you schedule emails in Outlook to be sent at a later time and reminds you to follow up on any of your messages that didn’t get responses. It also greatly simplifies meeting scheduling by allowing you to send your availability in an email without having to open up a separate calendar window.
Here’s how it works
1. Open a blank email form and enter the text you wish to send.

2. Look in the lower right-hand corner of the email for the Boomerang icon:

3. Click the Boomerang icon to open the following menu, which lists several useful options:

To set up a reminder
1. Create a new email or open an existing one.
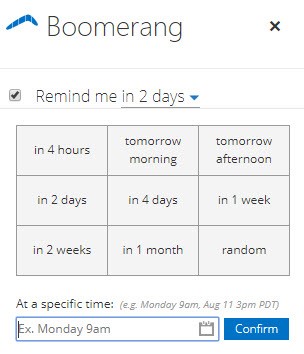
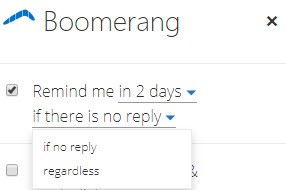
2. Choose the Remind me option.
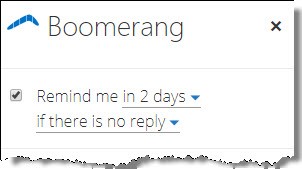
3. Set the reminder settings for this email, and click the Confirm button to proceed.
To suggest a meeting time
1. Open Boomerang.
2. Choose the Suggest Times option.
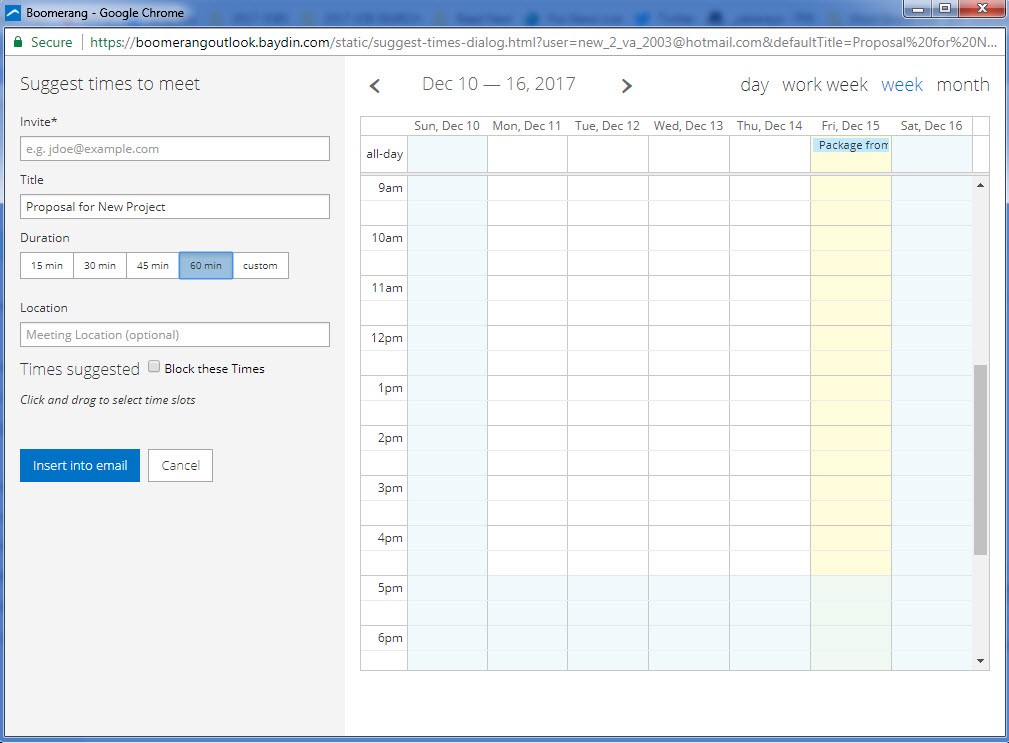
3. Enter the criteria for your availability, and click the Insert into email button before sending the email.
To schedule email to be send at a future time
1. Create a new email or open an existing one.
2. Open Boomerang.
3. Choose the Send later option.
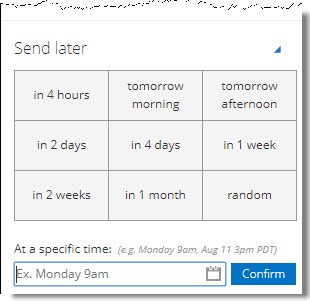
4. Set the Send later settings for this emailhen you’re done., and click the Confirm button when you’re done.
4) Pexels
The free Pexels add-in allows you to search for, view, and save royalty-free images that you can then insert into Word and PowerPoint documents.
1. Once you’ve downloaded the Pexels add-in, simply navigate to the Insert tab and click the Open Pexels option.

2. Doing so opens the Pexels app. Then, enter your image search criteria. Alternatively, you can click the Popular button to view currently popular image searches. In the following example, I used “computer” as my search criteria.

When you click on your desired photo, it will automatically be inserted into your Word document wherever your cursor was positioned.
To save a photo as a favorite, click the icon on the top-left corner of the image. You can then view your favorite images by clicking the My favorites button.
5) ASAP Utilities
ASAP Utilities has been around for a long time—since 1999, to be exact! Over time, it’s become a great resource for Microsoft Excel. The developers have even put together 50 short tutorials on how to use their add-in!
Before we get started, a word about license costs: You can download ASAP Utilities for free only if it is for home, school, or charitable organization use. For business licenses, it’s a one-time fee of $49.00 for a single user license.
The image below shows the ASAP Utilities ribbon, which is your starting point for using the add-in.

Add Multiple Worksheets:
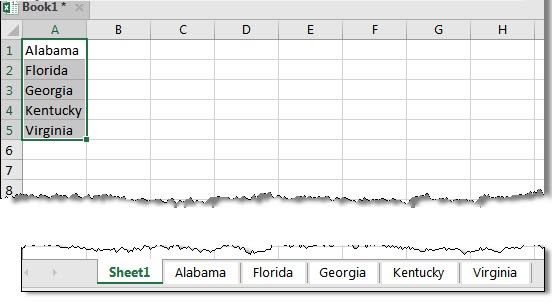
1. Select a range of cells that contain the names for your new sheets. (You can either use the Quick numbering of selected cells feature in ASAP Utilities or Excel’s built-in fill tools to help you quickly create a list of names.)
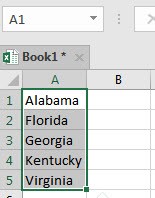
In the example above, I created a partial list of US states.
2. Click on Sheets under Time saving tools.
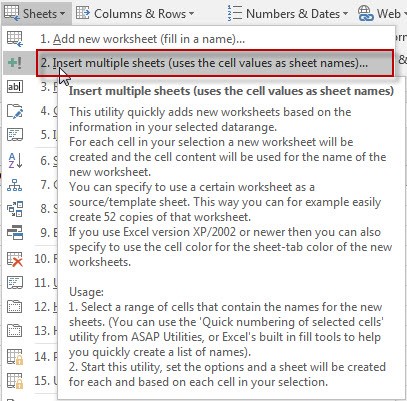
3. Hover over the second option. A description of the utility will appear.
4. Choose this option and fill out the details in the window below.
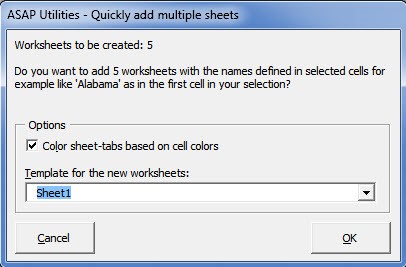
5. Click the OK button. The utility creates a sheet based on the contents of each cell in your selection.
Delete a Certain Number of Leading Characters
Suppose you have a column that lists part numbers for a certain product. Let’s say all parts begin with the letter “R”, and you decide to remove this letter from all values under this column. Your first instinct may be to run Find and Replace, but what if the column contains the letter “R” in other parts of its data, such as “R33TRF”? In that case, Find and Replace would remove all the “R”s, not just the leading ones.
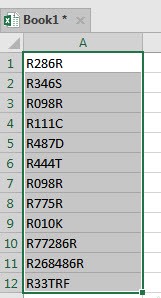
1. Start this utility by selecting Text under Time saving tools.
2. Hover over option #18. A description of the utility pops up.
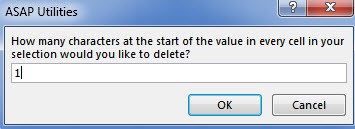
3. Choose option #18 and set the number of characters to remove in the window below. In this example, I chose “1”.
4. Click the OK button. The results are shown below:
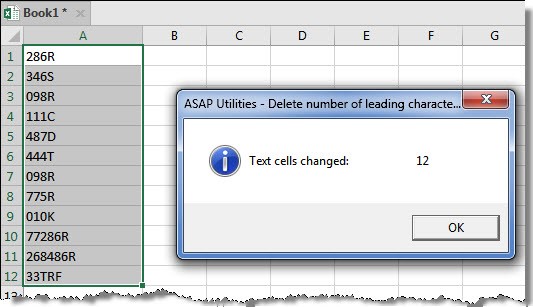
As you can tell from these examples, the ASAP Utilities Office 365 add-in is truly a great time saver.
Sherweb makes Office 365 easy so you can focus on your business
These are just a few of the many useful Office 365 add-ins that are available . Of course, there are many more that you can add to your Office applications for increased productivity. Want to learn more? Reach out to us!


